Those of us who tried creating Sitecore applications in
Speak 1.1 and 1.2 and spend most of our days in Visual Studio writing C# code,
attempting to create a Speak 3 application might be a bit of a challenge. It
certainly was for me. Even though Speak 3 feels much easier and intuitive than
its’ predecessors, it still has a learning curve for a backend developer who is
not familiar with NodeJs and Angular.
Having implemented my first Speak 3 application, I felt that
documenting what I had to go through might be beneficial not only for me 3
months down the road, but also for other developers. So here it is.
Prerequisites and tools
- Speak 3 is part of Sitecore 9 release, so to write applications in Speak 3 you need Sitecore 9.Sitecore 9 - https://dev.sitecore.net/Downloads/Sitecore_Experience_Platform/90/Sitecore_Experience_Platform_90_Initial_Release.aspx
The following items were used to create the Data Import
application:
- NodeJs 8.9.1 (includes npm 5.5.1) - https://nodejs.org/en/
- Visual Studio Code - https://code.visualstudio.com/ with following plugins

- Sitecore provided a list of downloads at https://dev.sitecore.net/Downloads/Sitecore_SPEAK/3/Sitecore_SPEAK_3.aspx
And documentation for Speak 3 at https://doc.sitecore.net/SPEAK/90/SPEAK%203
There is a sample application that you can look at to see
how an application should look like:

I have used packages.json
from the sample application to install required node modules with versions that
Speak 3 application expects. It is probably the easiest for a backend
developer.
One thing in the development process that is very unusual for a
backend developer and is worth mentioning. Speak 3 application development for
the most part can happen outside of Sitecore in disconnected mode, which means
there is no connection to Sitecore and you are working with frontend code
exclusively. You can mock service responses though.
Creating Angular application
Sitecore Speak 3 uses Angular 4, which means that all
modules you decide to use should support this version of Angular. In addition
to that syntax is different between Angular versions, and you need to pay
attention to that as well when writing your code.
You can follow the steps outlined in Quick Start
guide on Angular site at https://angular.io/guide/quickstart
to create an empty Angular 4 application.

Execution of these commands will
give you a folder structure for an Angular application that you can start
building your application upon.
I copied packages.json and .npmrc files from a
sample Speak 3 application that Sitecore documentation provided into the root
of my Angular application. If you are familiar with Angular, you might be able
to install necessary modules one by one using Sitecore documentation, but it
was a bit of a challenge for me, so I chose an easier route.


To define the port number my application should be running at, I added the following configuration entry in “defaults” property in angular-cli.json.

 I have been using mostly “start:disconnected” one during the development process. To run the application in this mode I have copied disconnected-mode.conf.js file into the root of my application folder:
 To call this script and start the application in disconnected mode I executed the following command in command prompt:
npm run-script start:disconnected
After this command is executed, if there are no exceptions during compilation I was able to see my application at http://localhost:[port] where [port] is port number that is specified in angular-cli.json file in the root of application.
In my case I had the application running at http://localhost:4300


I replaced HTML in it like so (following sample application):

To create a new page component, I ran the following command in the command prompt where I executed previous commands:
ng generate component landing-page

- In command prompt I executed
cd C:\Speak\codefenpm installThat created node_modules folder in the root of my application and installed modules specified in packages.json file.
- At this point, I could open the application in Visual Studio Code.

To define the port number my application should be running at, I added the following configuration entry in “defaults” property in angular-cli.json.
At first I created my Angular application without SASS. I was able to switch my project to use SASS by following instructions from http://brdjx.com/angular-4-with-sass/. If you switched to SASS and renamed existing .css files, make sure you updated references to scss files in @Component directive.
Running Angular application in disconnected mode
In addition to package versions, packages.json has a section that defines different commands to use for running applications in different modes.npm run-script start:disconnected
After this command is executed, if there are no exceptions during compilation I was able to see my application at http://localhost:[port] where [port] is port number that is specified in angular-cli.json file in the root of application.
In my case I had the application running at http://localhost:4300

At that point, my application was ready for feature development!
Speak3 Application Page
When you open app.component.html file which is the starting point of the page structure for application, you would see the following:

I replaced HTML in it like so (following sample application):

ng generate component landing-page
Now I have a new folder with all the necessary files for my new landing-page component.

Before the page would load properly and look like a Sitecore application with Sitecore CSS, I had to change styles configurations in angular-cli.json file like so:

I replaced styles.css with styles.scss and added ../node_modules/@speak/styling/dist/styles/sitecore.css
After that, I had to close the Visual Studio Code and reopen it again for the changes to take effect.
In the next step I added routing to the app.modules.ts file:

This tells the application to load LandingPageComponent when the root of application is being loaded.
After these steps had been performed I could start working on the actual Landing Page component. First I made changes to HTML file like so:

Then I had to add an implementation for properties and functions required by components I referenced in html:

At this point my application was ready to be compiled and previewed. To do that I run the same command I ran before to start my angular application:
npm run-script start:disconnected
After the application is successfully compiled I was able to view it in the browser:

To enable showing up of Logout section of the page, I copied three files into my mock folder from Sitecore sample application.

If you need to stop Angular application, in the command prompt window where you started it, press “Ctrl-C” and type Y.

Building Components
Sitecore Angular Business Component Library package comes with a number of components that you can use. It took me some time to find the description for these components. You can find the list, description on how to use each component, and samples in \node_modules\@speak\ng-bcl\CHANGELOG.md inside your Angular application.
Any other components you need can be created the same way you would create any other Angular4 component. There is plenty of tutorials and blogs online for that.
You can use translation in your labels that will take values from Sitecore when the application runs in Sitecore context.
For button labels the code looks like so:

While the application is still in disconnected mode, you would see something like this:
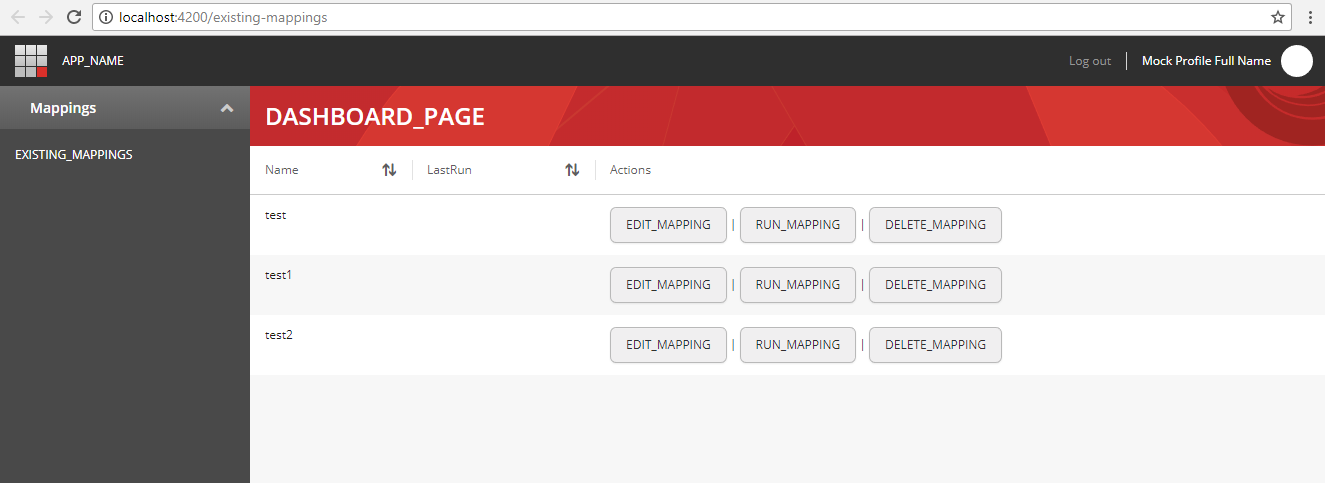
I was building a data import tool, and the page above shows the list of all available scripts for the import. My application calls Sitecore api to execute these scripts and save configurations that are created and edited in this application.
Creating of Sitecore Application items
To create a Speak3 Sitecore application I switched to core database and created a new Application item under /sitecore/client/Applications

Under the new node I created Translations and UserAccess items (the same as in sample application). In my Angular application in app.module.ts file I added/updated the following entries to match Sitecore IDs of my newly created items:

Packaging for deployment
Once I was happy with how application runs in disconnected mode it was time to bring it into Sitecore.
To do that I ran the following command in command prompt:
npm run-script build
This command created a dist folder in the root of my application.
Deploying Application to Sitecore
After my dist folder was ready I copied its content into C:\inetpub\wwwroot\[Sitecore Site]\sitecore\shell\client\Applications\XcMigrationTool
The destination path should match the path to application in Sitecore tree and base-href value in the script parameters in package.json

At this point my Speak3 application is ready to be loaded in Sitecore context.

I hope this might turn out to be helpful for someone :)
No comments:
Post a Comment